Summary
This article goes over how to record a slide show in Microsoft 365 Powerpoint and how to publish the recorded slide show, ready to share with others.
Contents
The article consists of the following sections which help in recording and publishing your slides in PowerPoint. Follow the links to your expected outcome:
How-To
Task: To record a slide show in Microsoft 365 Powerpoint.
Instructions
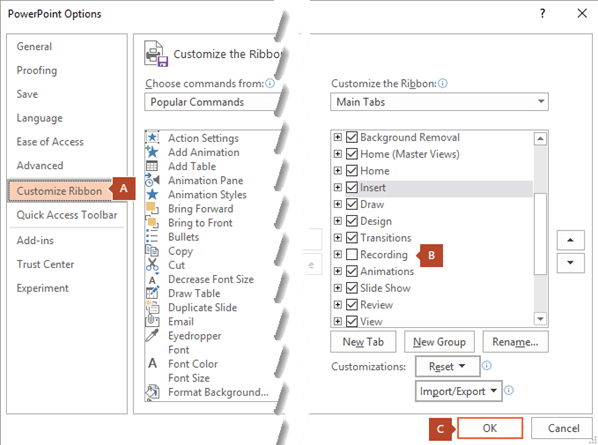
Step 1 - Turn on the Recording tab of the ribbon: On the File tab of the ribbon, click Options.
Step 2 - In the Options dialog box, click the Customize Ribbon tab on the left.
Step 3 - Then, in the right-hand box that lists the available ribbon tabs, select the Recording check box. Click OK.
Step 4 - To get ready to record, select Record Slide Show on either the Recording tab or the Slide Show tab of the ribbon.
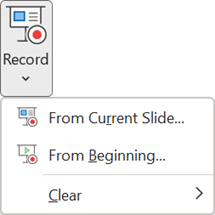
Note: The Clear command deletes narrations or timings, so be careful when you use it. Clear is grayed out unless you have previously recorded some slides.
- Clicking the upper half of the button starts you on the current slide.
- Clicking the lower half of the button gives you the option to start from the beginning or from the current slide.
- The slide show opens in the Recording window (which looks similar to Presenter view), with buttons at the top left for starting, pausing, and stopping the recording. Click the round, red button (or press R on your keyboard) when you are ready to start the recording. A three-second countdown ensues, then the recording begins.

- The current slide is shown in the main pane of the Recording window.
- You can stop the recording any time by pressing Alt+S on your keyboard.
- Navigation arrows on either side of the current slide allow you to move to the previous and next slides.
- PowerPoint for Office 365 automatically records the time you spend on each slide, including any Animate text or objects steps that occur, and the use of any triggers on each slide.
- You can record audio or video narration as you run through your presentation. The buttons at the lower-right corner of the window allow you to toggle on or off the microphone, camera, and camera preview:

- If you use the pen, highlighter, or eraser, PowerPoint records those actions for playback also.

- If you re-record your narration (including audio and ink), PowerPoint erases your previously recorded narration (including audio and ink) before you start recording again on the same slide.
- You can also re-record by going to Slide Show > Record Slide Show.
- You can pick a pointer tool (pen, eraser, or highlighter) from the array of tools just below the current slide. There are also color selection boxes for changing the color of the ink. (Eraser is grayed out unless you have previously added ink to some slides.)
Step 3 - To end your recording, select the square Stop button (or press S on your keyboard). When you finish recording your narration, a small picture appears in the lower-right corner of the recorded slides. The picture is an audio icon, or if the web camera was on during the recording, a still image from the webcam.

- The recorded slide show timing is automatically saved. (In Slide Sorter view, the timings are listed beneath each slide.)
- In this process, what you record is embedded in each slide, and the recording can be played back in Slide Show. A video file is not created by this recording process. However, if you need one, you can save your presentation as a video with a few extra steps.
Outcome
Your video has been recorded.
Back to Top
Task: To preview the recorded slide show.
Instructions
Step 1 - On the Slide Show tab, click From Beginning or From Current Slide.
Step 2 - During playback, your animations, inking actions, audio and video will play in sync.

Outcome
You can now preview your recorded video.
Back to Top
Task: To preview the recorded sound.
Instructions
Step 1 - In the Recording window, the triangular Play button near the top left corner lets you preview the recording of the slide that currently has the focus in that window.

Step 2 - Normal view, click the sound icon or picture in the lower-right corner of the slide, and then click Play. (When you preview individual audio in this way, you won't see recorded animation or inking.)
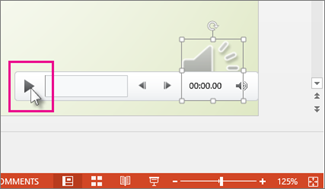
- You can pause playback while previewing the audio.
Outcome
You can now preview your recorded audio.
Back to Top
Task: To set the slide timings manually.
PowerPoint for Office 365 automatically records your slide timings when you add narrations, or you can manually set the slide timings to accompany your narrations.
Instructions
Step 1 - In Normal view, click the slide that you want to set the timing for.
Step 2 - On the Transitions tab, in the Timing group, under Advance Slide, select the After check box, and then enter the number of seconds that you want the slide to appear on the screen. Repeat the process for each slide that you want to set the timing for.
Step 3 - If you want the next slide to appear either when you click the mouse or automatically after the number of seconds that you enter -- whichever comes first -- select both the On Mouse and the After check boxes.
Note: You can use manual slide timings to trim the end of a recorded slide segment. For example, if the end of a slide segment concludes with two seconds of unnecessary audio, simply set the timing for advancing to the next slide so that it happens before the unnecessary audio. That way you don't have to re-record the audio for that slide.
Outcome
You can now set your timings in your recording.
Back to Top
Task: To delete timings or narration.
Instructions
Step 1 - The Clear command is for deleting timings or narration from your recording that you don't want or that you want to replace.
In the Recording window, the Clear command in the top margin of the window allows you to:
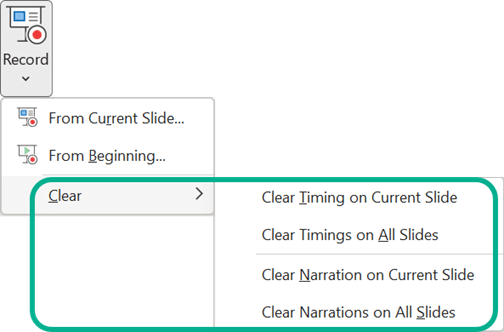
In Normal view, there are four different Clear commands that allow you to:
-
Delete the timings on the currently selected slide
-
Delete the timings on all slides at once
-
Delete the narration on the currently selected slide
-
Delete the narration on all slides at once
Step 2 - If you do not want to delete all the timings or narration in your presentation, open a specific slide that has a timing or narration that you do want to delete.
Step 3 - On the Recording tab of the PowerPoint for Office 365 ribbon, on the Record Slide Show button, click the down arrow, point to Clear, and then choose the appropriate Clear command for your situation.
Outcome
The timings or narration in your video have been deleted.
Back to Top
Task: To turn off timings or narrations and ink.
Instructions
After you've recorded your PowerPoint for Office 365 presentation, any timings, gestures, and audio you performed are saved on the individual slides. But you can turn them all off if you want to view the slide show without them:
-
To turn off recorded slide timings: On the Slide Show tab, clear the Use Timings box.
-
To turn off recorded narrations and ink: On the Slide Show tab, clear the Play Narrations box.
Outcome
You turned off timings or turned off narrations and ink in your Slide show.
Back to Top
Task: To publish the recording to share it with others.
Instructions
Once you've edited the recording to your satisfaction, you can make it available to others by publishing to Kaltura.
Step 1 - On the File menu, select Save to ensure all your recent work has been saved in PowerPoint presentation format (.pptx).
Step 2 - Click File > Export > Create a Video. (Or, on the Recording tab of the ribbon, click Export to Video.)
Step 3 - In the first drop-down box under the Create a Video heading, select the video quality you want, which pertains to the resolution of the finished video. The higher the video quality, the larger the file size. (You may want to test them to determine which one meets your needs.)
|
Option
|
Resolution
|
For displaying on
|
|
Ultra HD (4K)*
|
3840 x 2160, largest file size
|
Large monitors
|
|
Full HD (1080p)
|
1920 x 1080, large file size
|
Computer and HD screens
|
|
HD (720p)
|
1280 x 720, medium file size
|
Internet and DVD
|
|
Standard (480p)
|
852 x 480, smallest file size
|
Portable devices
|
Note: The Ultra HD (4K) option is only available if you're using Windows 10.
Step 4 - The second drop-down box under the Create a Video heading tells whether your presentation includes narration and timings. (You may switch this setting if you like.)
- If you haven't recorded timed narration, by default the value is Don't Use Recorded Timings and Narrations.
- The default time spent on each slide is 5 seconds. You can change that timing in the Seconds to spend on each slide box. To the right of the box, click the up arrow to increase the duration, or click the down arrow to decrease the duration.
- If you have recorded a timed narration, by default the value is Use Recorded Timings and Narrations.
Step 5 - Click Create Video.
Step 6 - In the File name box, enter a file name for the video, browse for the folder that will contain this file, and then click Save.
Step 7 - In the Save as type box, choose either MPEG-4 Video or Windows Media Video.
Step 8 - You can track the progress of the video creation by looking at the status bar at the bottom of your screen. The video creation process can take up to several hours depending on the length of the video and the complexity of the presentation.
Tip: For a long video, you can set it up to be created overnight. That way, it'll be ready for you the following morning.
Step 9 - Use the following guide to Upload your video to your Kaltura Library, if desired.
Outcome
Your video is now published and can be viewed by others.
Back to Top
Further Readings
Upload your video to your Kaltura Library
Need additional help?
For assistance concerning site creation, content sharing, file synchronization, or other common SharePoint, OneDrive, Teams, or Office app activities, we recommend our Microsoft 365 Learning sites:
Learn more about the great tools our Microsoft 365 Learning sites offer!
Visit the Technology Help Desk Support page to locate your local campus contact information or to submit an online technology support request. For password issues you must call or visit the Help Desk in person.