Summary
This article provides instructions about how to add guest collaborators and manage their permissions.
Content
Every member in Teams has a role, and each one has different permissions.

View Team owner, member, and guest capabilities in Microsoft Teams chart or see below:
How-To
The team owner is the only one allowed to add members to a team. Guest members can be added.
Add a guest to your Team
Guests must have an Office 365 work or school account. If the guest doesn’t yet have a Microsoft account associated with their email address, they are directed to create one for free.
Note: When you add a guest, only their name gets added to their profile card. To add or change other info (such as phone number or title), you'll need to contact your IT administrator.
For instructions, see Add guests to a team in Microsoft Teams or follow the steps below.
Instructions
Step 1 - Select Teams  and go to the team in your team list.
Step 2 - Select More options  > Add member.

Step 3 - Enter the guest's email address. Anyone with a business or consumer email account, such as Outlook, Gmail, or others, can join your team as a guest.
Note: If you receive a We didn't find any matches error while trying to add a guest, your organization doesn't allow guests.
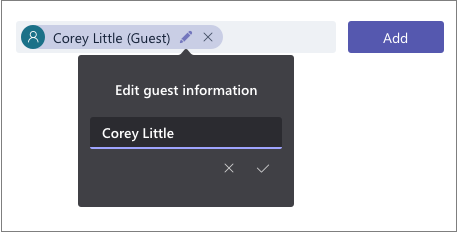
Step 4 - Add your guest's name. Select Edit guest information  and type a friendly name for them. Be sure to take the time to do this now — you’ll need the help of an IT admin to do it later.

Step 5 - Click Add.
Your guest receives a welcome email invitation that includes some information about joining Teams and what the guest experience is like .
Set guest permissions for Channels in Teams
Before you can update guest permissions, the person must be added as a guest to your team. Team owners can set guest permissions, but only from the desktop or web applications.
Guests have fewer capabilities than team members, but there's still a lot they can do in channels — where the work actually gets done in Teams! Team owners can set guest permissions for channels to control this. For more details, see Guest capabilities in Teams.
For instructions, see Set guest permissions for channels in Microsoft Teams or follow the steps below.
Instructions
Step 1 - Select Teams on the left side of the application.
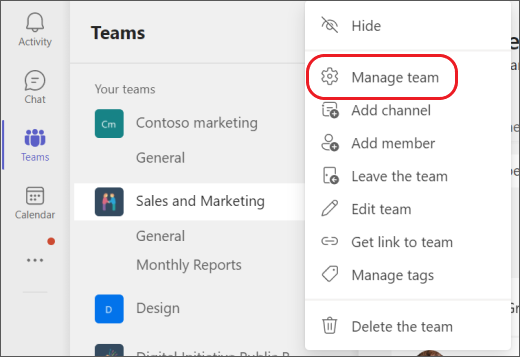
Step 2 - Go to the team name and select More options > Manage team.

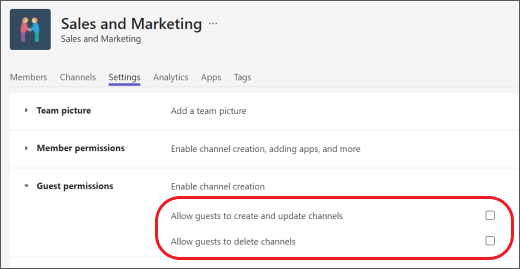
Step 3 - Select Settings > Guest permissions. Check or uncheck the permissions you want to use. Currently, you can give guests permission to create, update, or delete channels.

Step 4 - Go to the team name and select More options > Manage team.
Determine if a team has guests
- USNH tenant-wide setting allows guest access in Teams.
- When an individual is a guest, the word Guest displays next to their name.
View everyone's roles on the team to identify guests
Instructions
Step 1 - Navigate to the team name and select More options > Manage team.
Step 2 - Select Members. Guests will be identified next to their name.
Further Readings
LinkedIn Learning - Microsoft Teams
Set Guest Permissions
Add Guests to a Team
Guest experience in Teams
Guest access in Microsoft Teams
Team owner, member, and guest capabilities in Teams
Microsoft Teams - Work in Channels
Need additional help?
For assistance concerning site creation, content sharing, file synchronization, or other common SharePoint, OneDrive, Teams, or Office app activities, we recommend our Microsoft 365 Learning sites:
Learn more about the great tools our Microsoft 365 Learning sites offer!
Visit the Technology Help Desk Support page to locate your local campus contact information or to submit an online technology support request. For password issues you must call or visit the Help Desk in person.