During any Teams meeting, you can start a live transcription of the proceedings. The text appears alongside the meeting video or audio in real-time, including the speaker's name (unless they chose to hide it) and a time stamp. This article will review information about transcription and closed captioning in Microsoft Teams.
Who can start, stop, view, and download a transcript?
|
Type of meeting participant
|
Start and stop transcription
|
View real-time transcription
|
View transcript after meeting
|
Download transcript after meeting
|
|
Organizer
|
Yes
|
Yes
|
Yes
|
Yes
|
|
Person from same tenant*
|
Yes
|
Yes
|
Yes
|
Yes
|
|
Person from another tenant
|
No
|
Yes
|
No
|
No
|
|
Anonymous
|
No
|
No
|
No
|
No
|
* Your tenant is all the people who share common access to Teams, as defined by your IT admin.
Back to top
Best Practices for Using Auto Transcription
Consider using an external high-quality microphone, it will clear up the quality of your audio for the live transcription
Listen to the room you are in and consider turning down/off anything that makes a considerable amount of background noise
If there are any loud disruptions (i.e. fire truck driving by) pause and hold your thoughts until that noise passes
Speak slowly, it will help the system capture the words you are saying
Back to top
Enabling and Disabling Auto-Transcription
Live transcription can make your meeting more productive and inclusive for participants who are deaf or hard-of-hearing or have different levels of language proficiency. Participants in noisy places will also appreciate the visual aid.
People can choose to not be identified in meeting transcripts. For details, see Microsoft Support - Hide your identity in meeting captions and transcripts in Microsoft Teams
Task: Enable or disable the auto-transcription
Instructions
Step 1 - Go to the meeting controls and select More Actions
Step 2 - Choose Record and Transcribe, and select  Start Transcription.
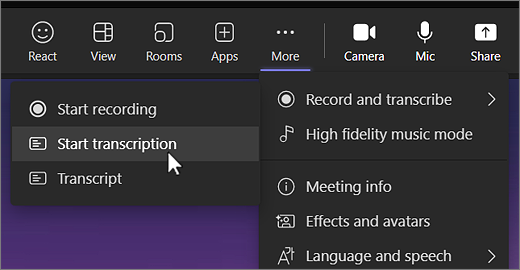
Tip: If you also want to record the meeting , select More options again and choose Start recording.
All participants see a notification that the meeting is being transcribed. The transcript appears on the right side of your screen.
Outcome
You will be able to enable (or disable) the auto-transcription.
Back to top
Change the Transcript Language
The transcript language must be the same as the language being spoken in the meeting.
Task: Change the language setting
Instructions
Step 1 - You'll see the live transcription on the right side of your screen. At the top right of the transcript window, select Transcript settings
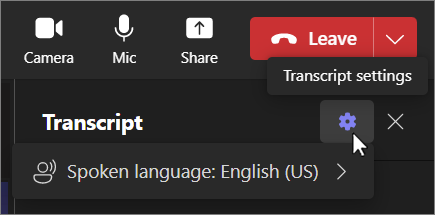
Step 2 - Hover over Spoken language. and choose another language everyone in the meeting is speaking.
Step 3 - Select Confirm. The transcript will now be displayed in this language.
Important: When you change the spoken language setting, it affects everyone. The transcript language (as well as that of the captions) will change for all meeting participants.
NOTE: You have up to 34 different language options for transcription:
English (US), English (Canada), English (India), English (UK), English (Australia), English (New Zealand), Arabic (Arab Emirates) , Arabic (Saudi Arabia) , Chinese (Simplified China), Chinese (Traditional, Hong Kong SAR), Chinese (Traditional, Taiwan) , Czech (Czechia) , Danish (Denmark), Dutch (Belgium) , Dutch (Netherlands), French (Canada), French (France), Finnish (Finland) , German (Germany), Greek (Greece) , Hebrew (Israel) , Hindi (India), Hungarian (Hungary) , Italian (Italy), Japanese (Japan), Korean (Korea) , Norwegian (Norway), Polish (Poland) , Portuguese (Brazil), Portuguese (Portugal) , Romanian (Romania) , Russian (Russia) , Slovak (Slovakia) , Spanish (Mexico), Spanish (Spain), Swedish (Sweden), Thai (Thailand) , Turkish (Turkey) , Ukrainian (Ukraine) , Vietnamese (Vietnam)
Outcome
You will be able to change the language of the transcript.
Back to top
Hide or Show Live Transcription
Task: Hide or Show Live Transcription
Instructions
Step 1 - Go to the meeting controls and select More actions
Step 2 - Select Record and transcribe, and choose Hide transcript or Transcript.
NOTE: Obscenities are obscured by asterisks.
Outcome
You will be able to hide (or show) the Live Transcription.
Back to top
Download the Transcript
When the meeting is over, the transcript is immediately available in the meeting event on the calendar. Meeting participants can download it as a .docx or .vtt file.
Task: Download the Transcript
Instructions
Step 1 - Select Chat on the left in Teams.
Step 2 - Open the meeting chat and select the transcript.
Step 3 - Above the transcript, select the down arrow next to Download  and then choose the file type you want.
Tip: After the meeting, along with the transcript, any other available meeting-related items (attached docs, meeting notes, the recording) will also be available from the Details tab when you open the meeting event.
Outcome
You will be able to download the meeting transcript
Back to top
Share the Transcript with Mobile Participants
Uploading the transcript to chat makes it available to meeting participants who joined from a mobile device.
Task: Share Transcript with Mobile Participants
Instructions
Step 1 - Download the transcript to your computer.
Step 2 - In the meeting chat, select Attach beneath the compose box and then upload the transcript.
Outcome
You will be able to share the transcript with mobile participants.
Back to top
Delete the Transcript
The meeting organizer can delete the transcript.
Task: Delete the meeting Transcript
Instructions
Step 1 - Open the meeting and go to Recordings & Transcripts.
Step 2 - Select Delete above the transcript to delete the transcript.
Outcome
You will be able to delete the meeting transcript
Back to top
Stop and Restart Live Transcription
The meeting organizer and presenters can stop and restart transcription during the meeting. (For info about organizer and presenter roles, see Roles in a Teams meeting .)
Task: Stop and restart Live Transcription
Instructions
Step 1 - Go to the meeting controls and select More Actions
Step 2 - Select Record and Transcribe and choose Stop transcription or Stop recording (if a recording is in progress).
The transcription stops automatically when all participants leave the meeting.
Outcome
You will be able to stop and restart the live transcription
For assistance concerning site creation, content sharing, file synchronization, or other common SharePoint, OneDrive, Teams, or Office app activities, we recommend our Microsoft 365 Learning sites: