Summary
This article describes how to set scheduling policies and publish the booking page.
Content
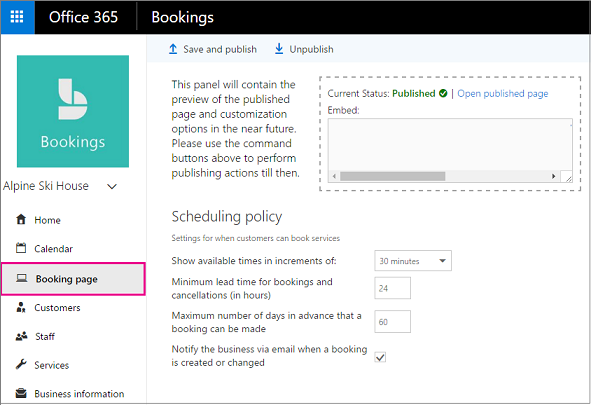
Not all appointments are the same. Some take only a few minutes, while others can take hours or more. In Microsoft Bookings, the Booking page is where scheduling policies can be set for a business. Scheduling policies include the length of appointments, acceptable lead and cancellation times, and automatic notifications of booking changes.
The policies set here are the top-level policies. They are automatically applied to all the services offered unless specifically modified on a per-service basis. For example, let's say that for most services, such as equipment repairs, one-day notice for cancellations are acceptable, but for those services that require facility reservations or fees, such as golf lessons, a three day notice may be preferred. This service-level policy can be configured on the Services page. See Define your service offerings for instructions.
This table explains the various types of scheduling policies available on the Booking page.
| Policy |
Explanation |
| Time increments |
Determines the intervals between appointments. Users can set their time increments from 5 minutes to 4 hours. They can also set their own customized time increments. An interval of 15 minutes, for example, means a customer could schedule a 60-minute appointment at 8:00, 8:15, 8:30, and so on. Conversely, a 60-minute interval means that appointments are only available on the hour. (To set service durations, see Define your service offerings ) |
| Lead time in hours |
Users can set their staffing plan based on the appointments that are scheduled so it's important to know in advance how many customers are coming in for service on any particular day. The lead time policy enables users to specify the number of hours in advance that customers should book or cancel an appointment. |
| Maximum days in advance |
If users want to limit how far in advance customers can book appointments, users can set the maximum for 365 days or more. |
| Notify when a booking is created or changed |
Select this option to receive an email any time a customer books an appointment or changes an existing one. The email goes to the mailbox specified on the Business information page. See Enter your business information for details. |
How-To
Task: To set policies.
Instructions
Step 1 - In Office 365, select the app launcher, and then select Bookings.

Step 2 - In the navigation pane, select Booking page.

Step 3 - Select your policies.
Step 4 - When the booking page is ready to be published, select Save and publish.
Outcome
Policies are set based on selections and the Booking page is published.
Further Readings
Publish or unpublish the booking page
Define your service offerings
Enter your business information
Need additional help?
For assistance concerning site creation, content sharing, file synchronization, or other common SharePoint, OneDrive, Teams, or Office app activities, we recommend our Microsoft 365 Learning sites:
Learn more about the great tools our Microsoft 365 Learning sites offer!
Visit the Technology Help Desk Support page to locate your local campus contact information or to submit an online technology support request. For password issues you must call or visit the Help Desk in person.