Summary
This article provides instructions on creating service details, assigning staff members to services, setting publishing and scheduling policy options, adding online meeting options to bookings, creating group bookings, and providing text message notifications. Follow the link to the task you want to achieve:
Content
When defining service offerings in Microsoft Bookings, users can set service names, descriptions, locations (in person or online), duration, default reminders to customers and staff, internal notes about the service, and pricing. Users are also able to tag the employees who are qualified to provide the service. When customers come to the business website to book an appointment, they are able to see exactly what types of appointments are available, choose the person they want to provide the service to, and how much their service will cost.
Users can now add customized information or URLs to the email confirmation and are also able to add reminders that are sent when someone books a service through your booking page.
How-To
Task: To create the service details.
Instructions
Step 1 - In Office 365, select the app launcher, and then select Bookings.
Step 2 - In the navigation pane, select Services > Add a service.
Step 3 - Enter the service details including name, description, and location. When typing an address in Default location, Bing suggests locations.
Step 4 - Enter the duration required for the service. Users can enter how long they want the duration to last in days, house and minutes, and set a buffer time when customers can't book.
Step 5 - Select the price model. For Fixed price, Starting at, and Hourly, users will be asked to specify a price.
Step 6 - Under Price and payments, set the default price for the service.
Step 7 - Enter additional notes and reminder information.
Step 8 - Select Save.
Outcome
The detailed information provided displays along with the service.
Back to top
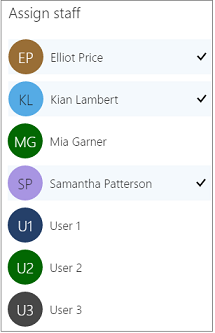
Task: To assign a staff member to the service.
When assigning staff, think about whether the service requires advanced training or special certifications. If so, only assign the staff members who hold those credentials. If the desired staff member isn't in the list, you'll have to go to the Staff page to add them. See Create your staff list for more information.
Instructions
Step 1 - On the Services page, select those employees who are qualified to provide this service. Multiple users can be selected.
Step 2 - Select Save.
Outcome
Selected employees have a check mark next to their names.
Back to top
Task: To set publishing and scheduling policy options.
By default, service details and staff assignments are posted to the booking page on the web site as soon as they are Saved. Scheduling policies are applied by default to the service created. If these default settings are not preferred, follow the steps below.
Instructions
Step 1 - On the Services page, under Publishing options, clear the check boxes next to Show this service on the booking page and/or Use the default scheduling policy.
Step 2 - Set the scheduling policies for this service. For more information about scheduling policies, see Set your scheduling policies
Step 3 - Select Save.
Outcome
The service details and/or default scheduling policy are not displayed on the booking page.
Back to top
Task: To add online meeting option to bookings.
Users can set up their services with an online meeting option. When a new booking is created, or updated, there are options to make them online appointments using Microsoft Teams or Skype for Business.
Important: Customers doesn't have to have a Teams license or Skype for Business license. They also don't need to have Teams or Skype for Business installed. Once they click on the link to join the online meeting, they'll be able to use Teams and Skype for Business through their browser.
Note: This feature is still rolling out and might not be available in your organization yet. For more info, check out When do I get the newest features in for Office 365?
Instructions
Step 1 - On the Services page, select the toggle to turn on online meetings.
Step 2 - Select Save.
Outcome
Once Add online meeting has been selected, staff members who have a Teams license or Skype for Business license are able to use this service. If staff members do not have Teams or Skype for Business licenses, they can't be assigned to this service when a customer tries to book.
Back to top
Task: To create group bookings.
Group bookings lets users to set up service appointments where multiple people can join a session with a single staff member. Users can use group bookings to schedule conferences, lectures or training sessions with several people at the same time.
Note: This feature is still rolling out and might not be available in your organization yet. For more information, refer to When do I get the newest features in for Office 365?
Instructions
Step 1 - On the Services page, under Maximum number of attendees, enter the number of people who can attend this event. Once users set the maximum number, the attendee list can't exceed the number set. By default, this field is empty.
Step 2 - Select Save.
Step 3 - After setting up the appointment in the calendar, add users to the service and send them an email invite.
Outcome
Multiple customers can now attend the same session or event with an individual staff member.
Back to top
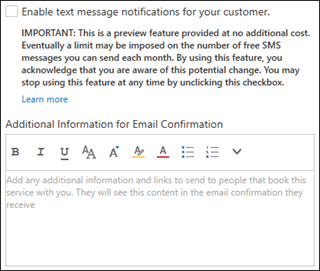
Task: To enable text message notifications.
When a customer creates a new booking or updates an existing booking, they have the option to receive reminder text message notifications. Customers must agree to getting text messages on the self service page before they can be received.
Note: This feature is only available in North America in preview. For more information, refer to When do I get the newest features in for Office 365?
Instructions
Step 1 - On the Services page, under Reminders and Confirmations, select Enable text message notifications for your customers.
Step 2 - Select Save.
Outcome
Customers are presented with the option to receive text messages when creating a new or updating an existing booking.
Back to top
Further Readings
Bookings: Creating and Staffing Bookings
Bookings: Scheduling Business Closures, Time Off, and Vacation Time
Need additional help?
For assistance concerning site creation, content sharing, file synchronization, or other common SharePoint, OneDrive, Teams, or Office app activities, we recommend our Microsoft 365 Learning sites:
Learn more about the great tools our Microsoft 365 Learning sites offer!
Visit the Technology Help Desk Support page to locate your local campus contact information or to submit an online technology support request. For password issues you must call or visit the Help Desk in person.